The short answer
By default, the curl command will only write to the standard output (i.e. stdout) the message body of the response. If you want to also include the HTTP headers and the status code of the response in the output, you can use the -i flag (short for include) as follows:
$ curl -i <url>
Where:
- <url> is the URL of the target server (e.g. https://example.com, 127.0.0.1:3000).
Which will output something similar to this:
HTTP/1.1 200 OK
X-Powered-By: Express
Content-Type: text/plain; charset=utf-8
Content-Length: 2
ETag: W/"2-nOO9QiTIwXgNtWtBJezz8kv3SLc"
Date: Fri, 07 Apr 2023 09:14:17 GMT
Connection: keep-alive
Keep-Alive: timeout=5
OK
This flag is often used by developers to get detailed information about how the server processed their request. For example, when performing basic authentication or sending JSON data.
Easily retrieve this command using Warp’s AI Command Search
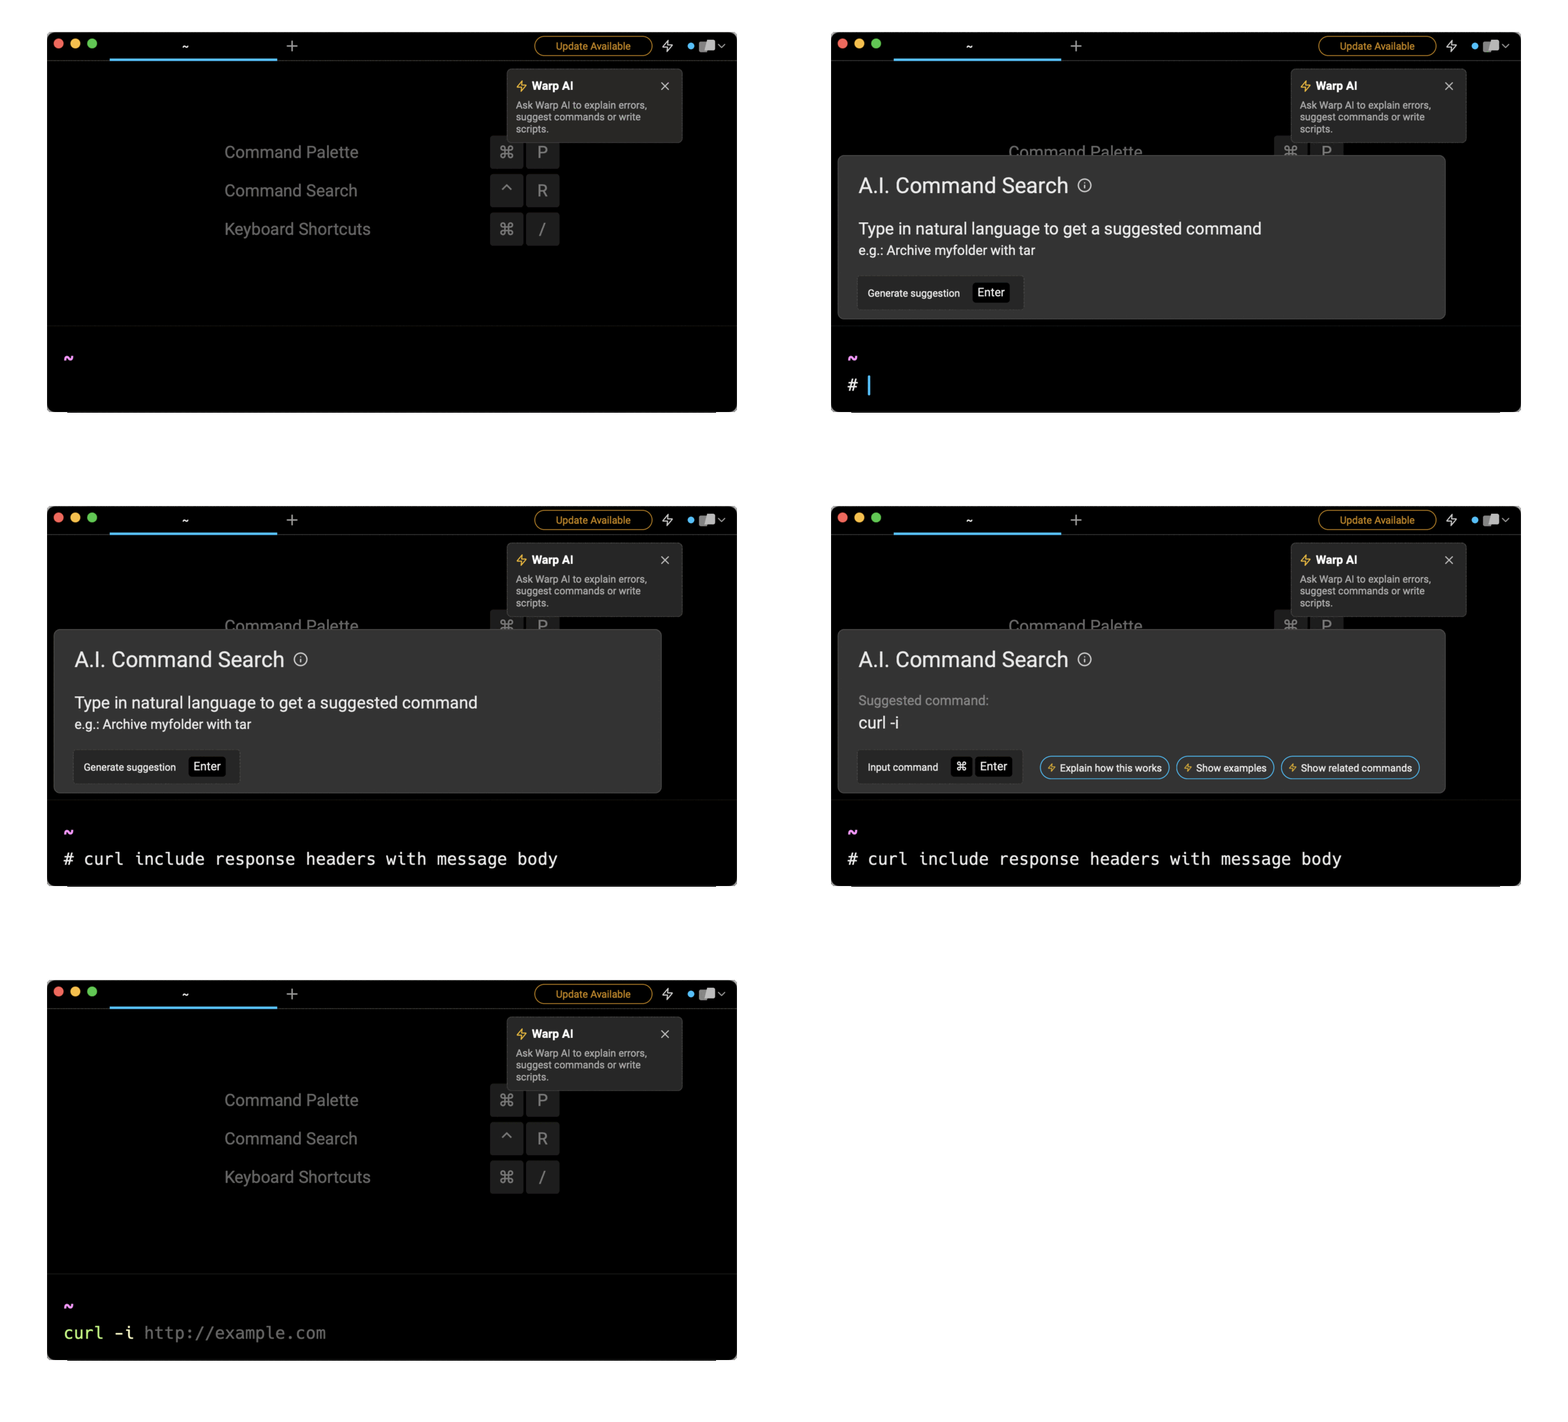
If you’re using Warp as your terminal, you can easily retrieve this command using the Warp AI Command Search feature:

Entering curl include response headers with message body in the AI Command Search will prompt curl -i, which can then quickly be inserted into your shell by doing CMD+ENTER.
Get the curl response headers only
To show the HTTP headers of the response only (i.e. without the message body), you can use the -I flag (capital “i”) as follows:
$ curl -I <url>
Which under the hood, will configure curl to send a HEAD request to the server indicating that only the headers of the requested resource should be returned but not its content.
For example:
$ curl -I 127.0.0.1:3000
HTTP/1.1 200 OK
X-Powered-By: Express
Content-Type: text/plain; charset=utf-8
Content-Length: 2
ETag: W/"2-nOO9QiTIwXgNtWtBJezz8kv3SLc"
Date: Fri, 07 Apr 2023 11:02:10 GMT
Connection: keep-alive
Keep-Alive: timeout=5
This flag is particularly useful when you want to retrieve the file size (i.e. the Content-Length header) and the last modification date (i.e. the Last-Modified header) of a resource located on a FTP server without actually downloading it.
Note that if you try to use this flag in conjunction with another HTTP method such as POST, curl might throw the following error:
$ curl -I -X POST -H
‘Content-Type: application/json’ -d ‘{“token”:”h3ll0”}’ https://example.com
Warning: You can only select one HTTP request method! You asked for both POST
Warning: (-d, --data) and HEAD (-I, --head).
Get both the curl request and response headers
For debugging purposes, it is sometimes useful to see exactly what is going on under the hood when sending a request with curl.
To make curl output the HTTP headers of both the request and the response, including the message body of the response and additional information provided by curl itself, you can use the -v flag (short for verbose) as follows:
$ curl -v <url>
Where the output is delineated by:
-
representing the data sent.
- < representing the data received.
- * representing additional information.
For example:
$ curl -v 127.0.0.1:3000
* Trying 127.0.0.1:3000...
* Connected to 127.0.0.1 (127.0.0.1) port 3000 (#0)
> GET / HTTP/1.1
> Host: 127.0.0.1:3000
> User-Agent: curl/7.85.0
> Accept: */*
>
* Mark bundle as not supporting multiuse
< HTTP/1.1 200 OK
< X-Powered-By: Express
< Content-Type: text/plain; charset=utf-8
< Content-Length: 2
< ETag: W/"2-nOO9QiTIwXgNtWtBJezz8kv3SLc"
< Date: Fri, 07 Apr 2023 11:01:19 GMT
< Connection: keep-alive
< Keep-Alive: timeout=5
<
* Connection #0 to host 127.0.0.1 left intact
Written by

Razvan Ludosanu
Founder, learnbackend.dev
Filed Under
Related Articles
List Open Ports in Linux
Learn how to output the list of open TCP and UDP ports in Linux, as well as their IP addresses and ports using the netstat command.

Count Files in Linux
Learn how to count files and folders contained in directories and subdirectories in Linux using the ls, find, and wc commands.

How to Check the Size of Folders in Linux
Learn how to output the size of directories and subdirectories in a human-readable format in Linux and macOS using the du command.

Linux Chmod Command
Understand how to use chmod to change the permissions of files and directories. See examples with various chmod options.

POST JSON Data With Curl
How to send valid HTTP POST requests with JSON data payloads using the curl command and how to avoid common syntax pitfalls. Also, how to solve the HTTP 405 error code.

Format Command Output In Linux
Learn how to filter and format the content of files and the output of commands in Linux using the awk command.
Create Groups In Linux
Learn how to manually and automatically create and list groups in Linux.
Switch Users In Linux
Learn how to switch between users, log in as another user, and execute commands as another user in Linux.
Remover Users in Linux
Learn how to remove local and remote user accounts and associated groups and files in Linux using the userdel and deluser commands.
Delete Files In Linux
Learn how to selectively delete files in Linux based on patterns and properties using the rm command.
Find Files In Linux
Learn how to find and filter files in Linux by owner, size, date, type and content using the find command.
Copy Files In Linux
Learn how to safely and recursively copy one or more files locally and remotely in Linux using the cp and scp command.
