Generate, Sign, and View a CSR With OpenSSL

Razvan Ludosanu
Founder, learnbackend.dev
Published: 2/1/2024
The short answer
A certificate signing request (CSR) is a file containing information about your business and its related website(s) used to request a digital certificate from a certificate authority (CA).
To generate a certificate signing request on Linux and macOS, you can use the following openssl req command:
$ openssl req -new -key <pkey>-out <csr>
Where:
- The -new flag is used to generate a new certificate request and prompts the user for relevant field values.
- The -key flag specifies the private key file to use for signing the certificate.
- The -out flag specifies the output filename to write to.
For example, the following command will generate a certificate signing request file named server.csr based on the private key file server.key.
$ openssl req -new -key server.key -out server.csr
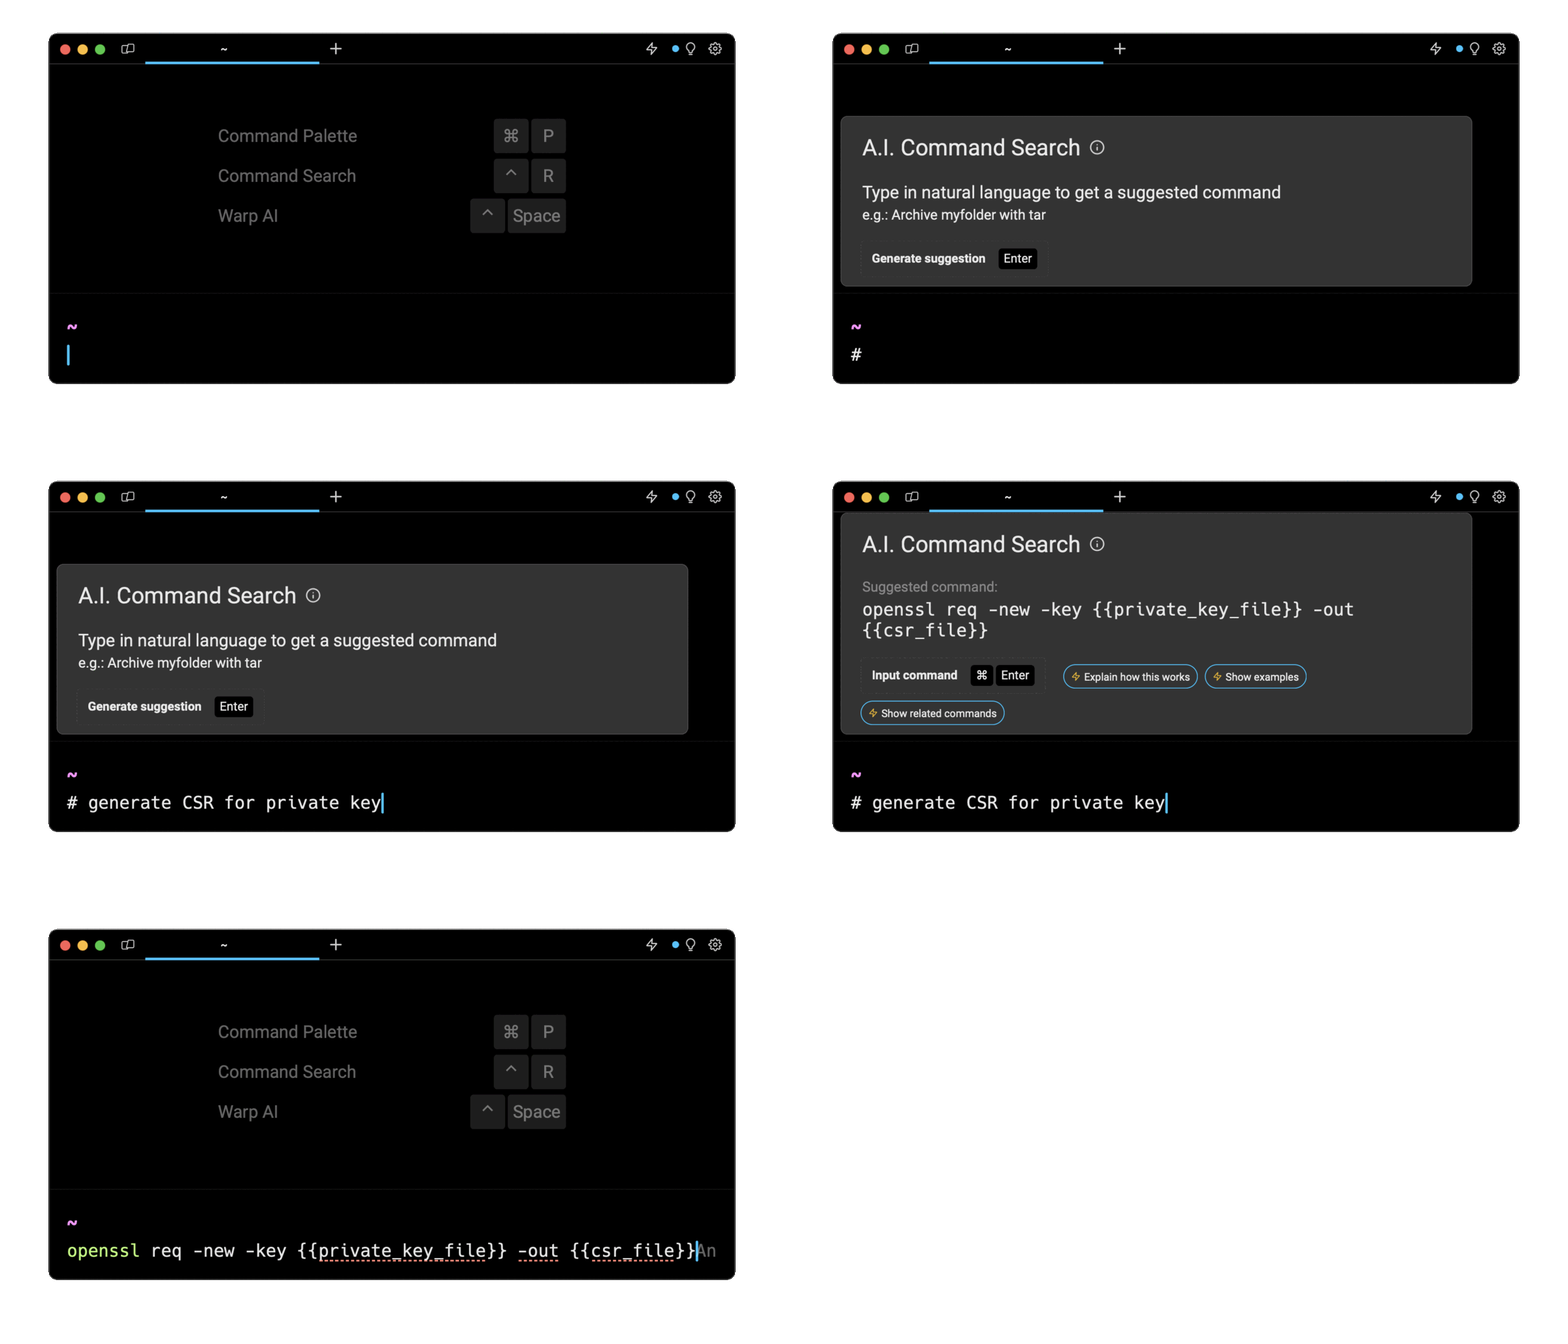
Easily retrieve this command using Warp’s AI Command Search
If you’re using Warp as your terminal, you can easily retrieve this command using the Warp AI Command Search feature:

Entering generate CSR for private key in the AI Command Search will prompt an openssl command that can then quickly be inserted into your shell by doing CMD+ENTER.
Generating a private key file
Before generating a certificate signing request, you will need to generate a private key file, which can be done using the following openssl genpkey command:
$ openssl genpkey -algorithm <alg>-out <pkey>
Where:
- The -algorithm flag specifies the public key algorithm used to generate the private key (e.g. RSA, DSA, DH, etc).
- The -out flag specifies the destination path of the private key file.
For example, the following command will generate a new private key file using the widely-used RSA algorithm:
$ openssl genpkey -algorithm RSA -out server.key
Generating a private key and a certificate signing request at once
To generate both a private key and a certificate signing request at once, you can use the following command:
$ openssl req -new -newkey rsa:2048 -keyout server.key -out server.csr
Where:
- The -newkey rsa:2048 flag is used to generate a new private key using the RSA algorithm on 2048 bits.
Generating a certificate signing request with subject alternative names
A subject alternative name (SAN) is a structured way to indicate all of the domain names and IP addresses that are secured by the certificate.
To generate a certificate signing request with subject alternative names, you need to create a configuration file (e.g. csr.conf) with the following structure:
[req]
default_bits = 2048
prompt = no
default_md = sha256
req_extensions = req_ext
distinguished_name = dn
[dn]
C = <Country Code>
ST = <State or Province>
L = <Locality>
O = <Organization>
OU = <Organizational Unit>
CN = <Common Name>
[req_ext]
subjectAltName = @alt_names
[alt_names]
DNS.1 = <Domain Name 1>
DNS.2 = <Domain Name 2>
Update placeholder values such as <Country Code>, <Locality>, <Domain Name 1>, etc.
And run the following command to generate the file:
$ openssl req -new -config csr.conf -key server.key -out server.csr
Verifying a certificate signing request
Once generated, you can verify the content of your certificate signing request using the following openssl req command:
$ openssl req -in <csr> -text -noout -verify
Where:
- The -in flag specifies the input file to read from.
- The -text flag prints out the request certificate in text form.
- The -noout flag prevents the output from being encrypted.
- The -verify flag verifies the self-signature on the request.
For example:
$ openssl req -in server.csr -text -noout -verify
Certificate Request:
Data:
Version: 0 (0x0)
Subject: C=US, ST=Ohio, L=Des Moines, O=Example,
CN=https://example.com/[email protected]
Subject Public Key Info:
Public Key Algorithm: rsaEncryption
RSA Public-Key: (2048 bit)
Modulus:
00:da:2f:a0:87:c1:1a:60:06:3b:8a:4b:7c:0c:38:
47:41:3c:3a:62:fb:c7:e9:1b:60:2c:38:5f:f6:42:
9a:ee:cf:6a:03:64:be:1d:02:b5:d7:2d:be:64:92:
Exponent: 65537 (0x10001)
Attributes:
challengePassword :unable to print attribute
Signature Algorithm: sha256WithRSAEncryption
33:57:9d:7f:ed:93:b2:c1:ee:38:c7:d7:62:ef:49:08:f3:af:
45:e8:ff:ca:c3:cd:65:64:29:c4:28:cf:82:88:0a:90:47:d2:
c9:1f:43:63:cd:45:23:c3:40:40:95:38:30:d7:df:40:60:30:
Self-signing a certificate signing request
Once generated, a certificate signing request must be signed by a certificate authority in order to be transformed into an actual certificate that can be used to encrypt data.
However, it is also possible to generate a self-signed certificate, which is a certificate that is signed using its own private key.
To sign a CSR, you can use the following openssl ca command:
$ openssl ca -in <csr> -out <cert>
Where:
- The -in flag specifies the source path of the certificate signing request file.
- The -out flag specifies the destination path of the certificate file.
For example:
$ openssl ca -in server.csr -out server.arm
Note that, when using a self-signed certificate, warnings may be displayed in the user’s browser as it is not issued by a trusted certificate authority.
Written by

Razvan Ludosanu
Founder, learnbackend.dev
Filed Under
Related Articles
Bash If Statement
Learn how to use the if statement in Bash to compare multiple values and expressions.

Bash While Loop
Learn how to use and control the while loop in Bash to repeat instructions, and read from the standard input, files, arrays, and more.
POST JSON Data With Curl
How to send valid HTTP POST requests with JSON data payloads using the curl command and how to avoid common syntax pitfalls. Also, how to solve the HTTP 405 error code.

Use Cookies With cURL
Learn how to store and send cookies using files, hard-coded values, environment variables with cURL.
Loop Through Files in Directory in Bash
Learn how to iterate over files in a directory linearly and recursively using Bash and Python.

How To Use sudo su
A quick overview of using sudo su

How to use sudo rm -rf safely
We'll help you understand its components

How to run chmod recursively
Using -R is probably not what you want

Run Bash Shell In Docker
Start an interactive shell in Docker container

Curl Post Request
Use cURL to send data to a server

Reading User Input
Via command line arguments and prompting users for input

Bash Aliases
Create an alias for common commands

