Some prose about Poetry: The Python package and dependency manager
Jess Lin
If you’ve been writing Python for any amount of time, you’ve probably run into pip and virtualenv, and venv. Maybe you’ve used pyenv too, and Pipenv, and for the data scientists out there, Anaconda. If you’ve been at it for a while… remember disutils and easy_install?
Poetry is one tool that’s emerged as a crowd favorite. In this post, we’ll highlight some features of Poetry that make it easy to use. Where visual examples are helpful, we’ll show inputs and outputs using the Warp terminal, which was recently updated to better support Poetry’s shell command.
Notably, Poetry simplifies and improves upon what’s come before. To grok what Poetry is and does—why add a tool when there are so many?—let’s take a quick look at history. Git history.
Why was Poetry created?
Though the current Poetry README has evolved, in an early version of the README from 2018, the original reason for Poetry’s existence is spelled out. In short, the main goal was to make Python packaging and dependency management easier to do, by combining configurations split across multiple files (and tools) into one file, one tool.
From the README, we can tell that Pipenv was, at the time, the notable alternative (“What about Pipenv?”), and what Poetry intended to improve upon. So to understand Poetry, we need to understand Pipenv. But Pipenv is itself an attempt to combine what came before. So to understand Pipenv, we should go back one step further, to pip and virtualenv/venv. And for completeness, we should understand how pyenv fits in the picture.
Three jobs in package and dependency management
Before we continue, let’s first clarify some terms, and define which problems these tools try to solve. It’ll make everything easier to understand.
You might have a sense that all these tools solve problems with packages and dependencies. But we don’t blame you if you don’t know exactly which tool does what off the top of your head.
Each of these tools does one or more of three deceptively simple jobs to be done. The scope of these jobs span from one individual Python project, to your operating system.
Job 1: Dependency resolution
Job 1 is dependency resolution. Within an individual Python project, you’ll often want to use packages that other people have written. How do you specify these dependencies and install them (or uninstall them)? A tricky part of this operation is installing all the nested dependencies of each package you directly depend on. If two packages you directly depend on—let’s call them A and B—rely on the same nested dependency C, you need to look up the version(s) of C that A accepts and the version(s) of C that B accepts, and see if there’s a version of C that satisfies those constraints. If not, you want the installation tool to accurately detect this, and tell you the problem.
A separate but related job, which we’ll call Job 1B, is building and publishing your own packages for others to use, i.e. getting your code into PyPI.
Job 2: Project isolation
Job 2 is keeping different versions of the same package isolated on a project-by-project basis. You may want to work on different Python projects—for example, a web app, and a library—on the same machine. However, each project may depend on a different version of the same package, whether it’s a direct dependency or a nested dependency. So, how do you create a separation between projects on your machine so they can use different versions of the same package without conflicts?
Job 3: Managing different versions of Python
Job 3 is managing different versions of Python. Similar to Job 2, you may want to use different versions of Python in different projects, or a different version of Python in a project than your operating system depends on. How do you install multiple versions of Python on your machine, and specify when to use each?
Three simple jobs. But the devil’s in the details, and in ease of use.
How Poetry improves on its ancestors
Let’s understand how the tools we mentioned do these jobs.
We’ll build up from earlier tools, starting with pip and virtualenv/venv, then pyenv, and Pipenv, before arriving at Poetry. In this lineage, we’ll highlight where each tool improved on what came before.
pip
Pip is the official package installer built into Python. It solves Job 1: installing, uninstalling, and managing Python package versions within a Python project. Pip was released in 2008 after Python 2.7.9, as a replacement for disutils and its third-party equivalent, easy_install.
Pip improved on easy_install by supporting installing packages using a requirements.txt file, which lets you record the dependencies of a project in one place. requirements.txt has a simple format: each dependency is listed on a separate line, along with its version specification. For example, a simple requirements.txt could look like this:
numpy==1.24.3
tensorflow >= 1.0, <= 2.0
You can learn more about the requirements.txt format here.
On one hand, requirements.txt is simple. But the simplicity has downsides. For example, you can’t express the difference between a dev dependency and a production dependency. Pip does not include a way to specify the installed versions of nested dependencies, nor does it have a lock file, so you cannot ensure you install the same versions of all dependencies every time you call pip install -r requirements.txt.
virtualenv and venv
Virtualenv and venv both tackle Job 2: enabling you to use different versions of the same packages in different Python projects, as well as one sliver of Job 3: specifying the Python version to point to. They accomplish this by letting you create virtual environments to isolate projects from each other. virtualenv was the precursor; it was created in 2007 outside of Python. A portion of virtualenv became the venv module, which was built into Python in 2012 with the release of Python 3.3.
One footgun with using both of these tools is that you must activate the virtual environment for each Python project before you can use it, and you can forget to do this, and consequently install a package in the wrong place (commonly the global environment). If you’ve used these tools, you’ve probably made this mistake at least once.
pyenv
Pyenv is focused on Job 3: it lets you install and specify where to use different versions of Python on your machine. To specify the Python version to use, you set an environment variable (PYENV_VERSION), or create a .python-version file in the directory where you want to use a specific version of Python. pyenv’s stated goal is to do one thing. The README states that it “follows the UNIX tradition of single-purpose tools that do one thing well.” It’s an admirable stance, and pyenv follows it well.
Pipenv
Pipenv, which was first released in January 2017, combines aspects of pip and virtualenv/venv; thus it does Jobs 1, 2, and the slice of 3 we mentioned above.
Pipenv’s Pipfile and Pipfile.lock fill gaps in pip. The Pipfile is in TOML format, and includes a separate section for dev dependencies. The Pipfile.lock ensures that you can reliably install the same versions of nested dependencies.
Poetry
Finally, we arrive at Poetry. Poetry is most similar to Pipenv, and as we saw at the start, Poetry’s original goals included improving upon Pipenv.
The main difference today comes down to ergonomics, and perhaps a sense of which project has more momentum. For example, the Pipfile needs to be combined with other files to build and publish a package; as we’ll demonstrate below, the process in Poetry is simpler. Python officially introduced the pyproject.toml file as the source of truth for dependencies and configs, and Pipenv doesn’t support this; in contrast, Poetry came out of the gate with pyproject.toml as a central design goal.
Poetry in action
Let’s explore how Poetry works. We’ll highlight a few commands in each of the jobs to be done. If you’re already familiar with Poetry, this might be a review; if you’re familiar with other tools, consider how you might do the same thing with the tools you know.
Install and follow along
In these examples, we’ll be using the Warp terminal, which adds visual and functional sugar to Poetry’s shell command. If you want to follow along, install Poetry and install Warp.
Job 1: Using Poetry to resolve dependencies and manage packages
Let’s start with a look at how Poetry helps you create, use, and publish packages.
poetry new
To create a new Python project, use the poetry new command. This generates a new Python project with good defaults. Here’s an example:
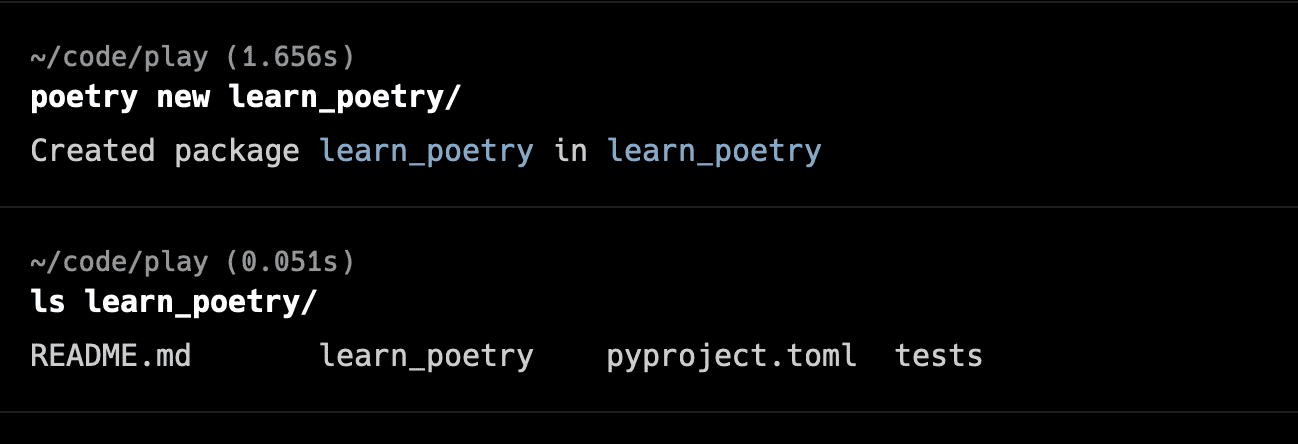
The generated project contains a few files organized into good default directories, including one for tests. The project structure looks like this:
learn_poetry
├── pyproject.toml
├── README.md
├── learn_poetry
│   └── __init__.py
└── tests
    └── __init__.py
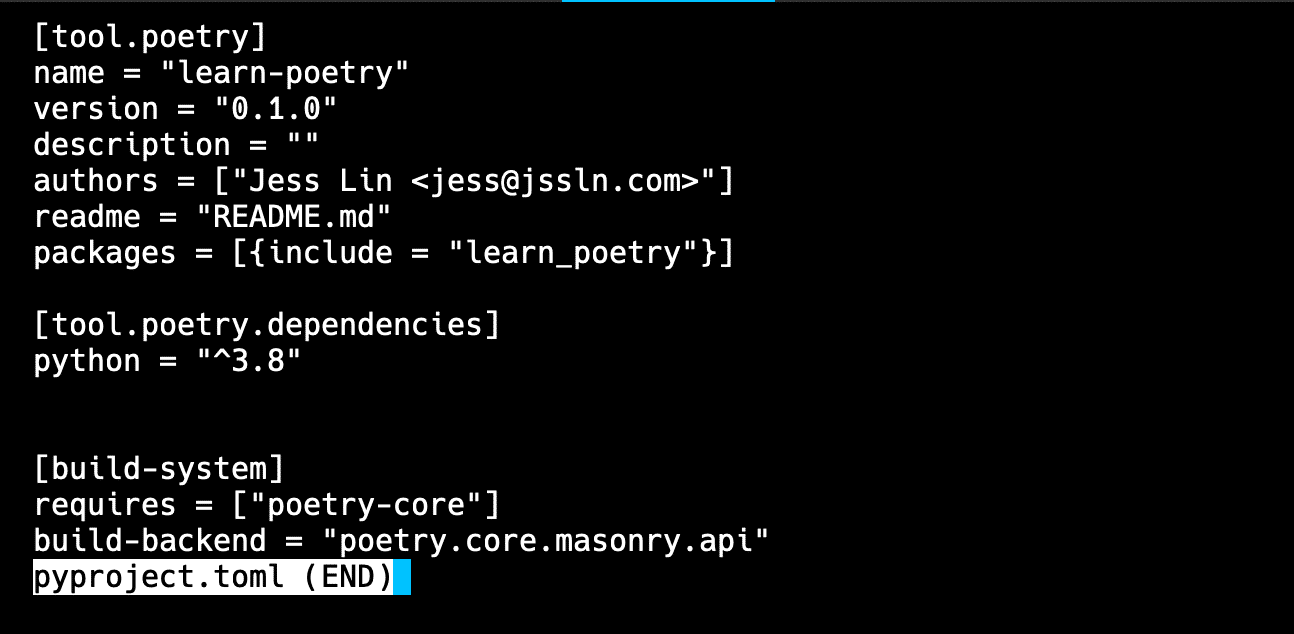
The most notable file here is pyproject.toml. It has three sections: basic package details under [tool.poetry]; dependencies (with the version of Python you used) under [tool.poetry.dependencies]; and build-time dependencies under [build-system].
poetry add / poetry remove
To add a dependency, use the poetry add command. There’s a counterpart, poetry remove. You can specify package versions with @^, @~, =, ==. If you don’t specify a version, Poetry installs the latest version.
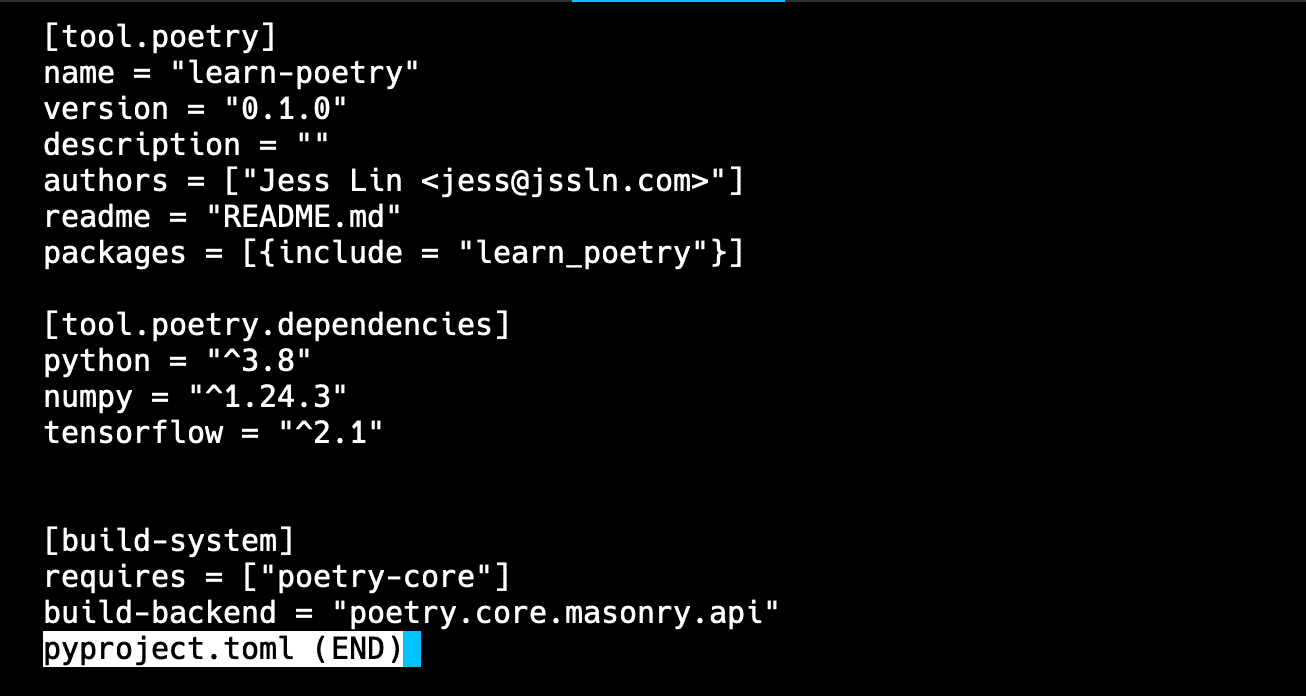
Poetry updates pyproject.toml with each dependency, and creates a poetry.lock file that tracks the exact versions of all dependencies that were installed, including nested dependencies.
Here’s an example:
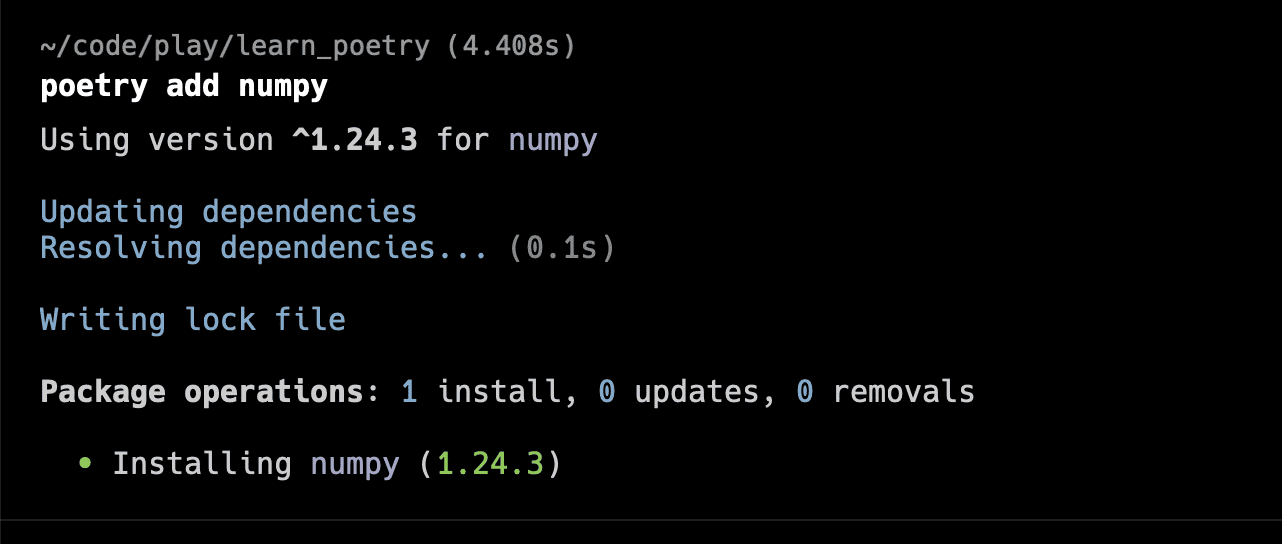

After we run these two commands, we find that pyproject.toml has been updated with our two new dependencies:
And, there’s a poetry.lock file in our folder now.

For a cool visualization of these dependencies, now run:
poetry show -- tree
poetry build / poetry publish
We don’t have a library to publish yet, but if we did, it would be easy to put it on PyPI, using poetry build and poetry publish. It would be simpler than the historical process that involves configuring setup.py.
For testing, you can configure TestPyPI as a publishable repository.
poetry config repositories.testpypi https://test.pypi.org/legacy/
Then you can publish to TestPyPI before publishing to PyPI.
poetry publish -r testpypi
Jobs 2 & 3: Using Poetry to isolate projects and manage different versions of Python
Now let’s learn how Poetry helps us isolate packages between different Python projects and specify Python versions.
If you’ve been following along, you may have noticed we didn’t activate a virtual environment. We didn’t forget. Okay, maybe we forgot.
Fortunately, Poetry uses a virtual environment by default. Poetry checks if it’s in a virtual environment. If not, it either uses one it finds, or creates one.
env list / env info
We can use poetry env list to find which environments poetry knows about, and which one is active.
Let’s try that now:

Run poetry env info to learn where the environment was created, as well as which Python version it uses. You’ll notice that by default, Poetry creates the virtual environment in a single folder, but we can change this if we want. If you prefer your env files to live within the Python project, you can set virtualenvs.in-project = true in pyproject.toml, and Poetry will create and use a folder called .venv within the root directory of your project. You can also switch between Python versions, using env use.
shell
poetry shell is a quick way to activate a shell using the project’s virtual environment. This command is convenient because as we saw, Poetry by default stores each virtual environment in a single folder outside of any Python project. However, poetry shell means you don’t have to think about where the virtual environment files live.
You can also use poetry run python my_script.py to run a Python script within the poetry virtual environment. Entering the Poetry shell can shorten that to python my_script.py.
Let’s try that out. As an example, we’ll first create a simple demo script in learn_poetry/print_zeros.py. It uses a dependency of this project, numpy.
import numpy as np

def zeros(x, y):
    arr = np.zeros((x, y))
    print(arr)

if __name__ == "__main__":
    zeros(3, 4)
Let’s run this script using the shell.
Run poetry shell. If you’re in Warp, you’ll be prompted with an option to “Warpify subshell." This gives the subshell all the visual goodness in Warp’s main shell.

Here’s a quick comparison.Without the Warpified subshell:

With the Warpified subshell:


In short, if you’re running poetry shell in Warp, you should be sure to Warpify your subshell.
Within the Warpified subshell, you’ll get syntax highlighting, and each command and its output will be grouped into a Warp block. Blocks let you quickly navigate through your command history, copy/paste a command and its output, and keep track of notable commands during your working session by bookmarking them. You can also save and share Warp blocks with your team, which is helpful for debugging async.
Wrap-up… Warp up?
The history of Python package and dependency management is a reflection of our collective drive as programmers to make better tools. Whenever we make a better tool, we find ways to make it even better.
Poetry grew out of this culture. Though it’s at the leading edge of the Python package and dependency management lineage, we’re sure it will keep improving. That, in a way, is also the story of Warp.
Perhaps you can be the one to add to this history. We invite you to understand and critique the tools today. Give Poetry and Warp a try, and let us know what you think.

